Comment publier sa documentation via ReadTheDocs ?
Dans le cadre de projets open-source, faire une documentation claire et lisible est un nécessité. Pour cela, ReadTheDocs permet de générer à partir de fichiers fournis au format Markdown une belle documentation.
![]()
Créer sa documentation avec Sphinx
Il faut tout d’abord installer le paquet python-sphinx :
$ sudo yum install python-sphinx
Après l’installation, allons dans le projet et créons le dossier de travail :
$ cd /chemin/de/votre/projet
$ mkdir docs
$ cd docs
On initialise le projet avec Sphinx :
$ sphinx-quickstart
Welcome to the Sphinx 1.1.3 quickstart utility.

Please enter values for the following settings (just press Enter to
accept a default value, if one is given in brackets).

Enter the root path for documentation.
> Root path for the documentation [.]: .

You have two options for placing the build directory for Sphinx output.
Either, you use a directory "_build" within the root path, or you separate
"source" and "build" directories within the root path.
> Separate source and build directories (y/N) [n]:

Inside the root directory, two more directories will be created; "_templates"
for custom HTML templates and "_static" for custom stylesheets and other static
files. You can enter another prefix (such as ".") to replace the underscore.
> Name prefix for templates and static dir [_]:

The project name will occur in several places in the built documentation.
> Project name: MyProject
> Author name(s): AuthorName

Sphinx has the notion of a "version" and a "release" for the
software. Each version can have multiple releases. For example, for
Python the version is something like 2.5 or 3.0, while the release is
something like 2.5.1 or 3.0a1.  If you don't need this dual structure,
just set both to the same value.
> Project version: 0.x.0
> Project release [0.x.0]:

The file name suffix for source files. Commonly, this is either ".txt"
or ".rst".  Only files with this suffix are considered documents.
> Source file suffix [.rst]:

One document is special in that it is considered the top node of the
"contents tree", that is, it is the root of the hierarchical structure
of the documents. Normally, this is "index", but if your "index"
document is a custom template, you can also set this to another filename.
> Name of your master document (without suffix) [index]:

Sphinx can also add configuration for epub output:
> Do you want to use the epub builder (y/N) [n]:

Please indicate if you want to use one of the following Sphinx extensions:
> autodoc: automatically insert docstrings from modules (y/N) [n]:
> doctest: automatically test code snippets in doctest blocks (y/N) [n]:
> intersphinx: link between Sphinx documentation of different projects (y/N) [n]:
> todo: write "todo" entries that can be shown or hidden on build (y/N) [n]:
> coverage: checks for documentation coverage (y/N) [n]:
> pngmath: include math, rendered as PNG images (y/N) [n]:
> mathjax: include math, rendered in the browser by MathJax (y/N) [n]:
> ifconfig: conditional inclusion of content based on config values (y/N) [n]:
> viewcode: include links to the source code of documented Python objects (y/N) [n]:

A Makefile and a Windows command file can be generated for you so that you
only have to run e.g. `make html' instead of invoking sphinx-build
directly.
> Create Makefile? (Y/n) [y]:
> Create Windows command file? (Y/n) [y]: n

Creating file ./conf.py.
Creating file ./index.rst.
Creating file ./Makefile.

Finished: An initial directory structure has been created.

You should now populate your master file ./index.rst and create other documentation
source files. Use the Makefile to build the docs, like so:
   make builder
where "builder" is one of the supported builders, e.g. html, latex or linkcheck.
Après avoir commité votre dossier docs\ sur GitHub, nous allons configuré le projet sur ReadTheDocs.
Configurer son projet sur ReadTheDocs
Après avoir créé un compte, il faut aller sur le tableau de bord puis cliquer sur Import.
Je vais prendre PHPWord comme exemple pour lequel j’ai réalisé le début de la documentation.
La première partie du formulaire permet de définir le nom du projet, le dépôt et le type de dépôt du projet, suivi d’une description du projet.
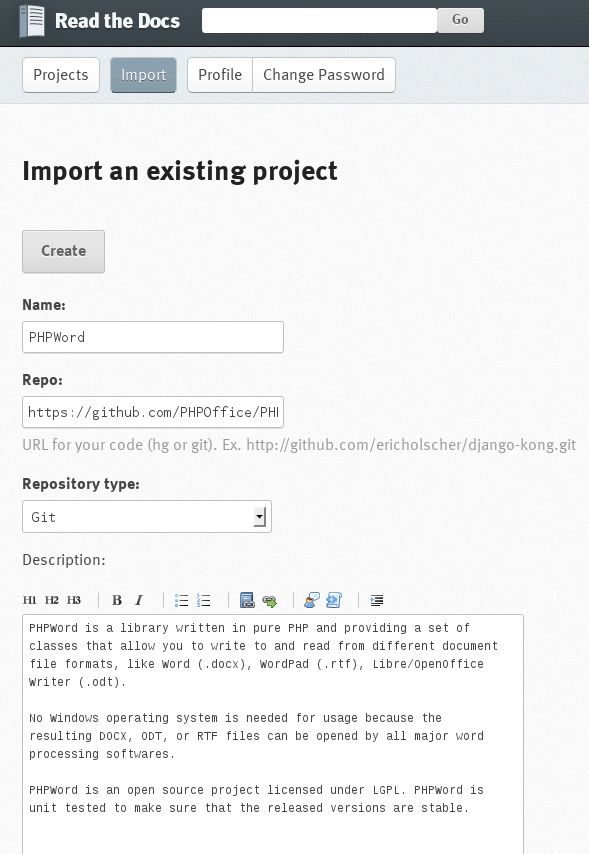
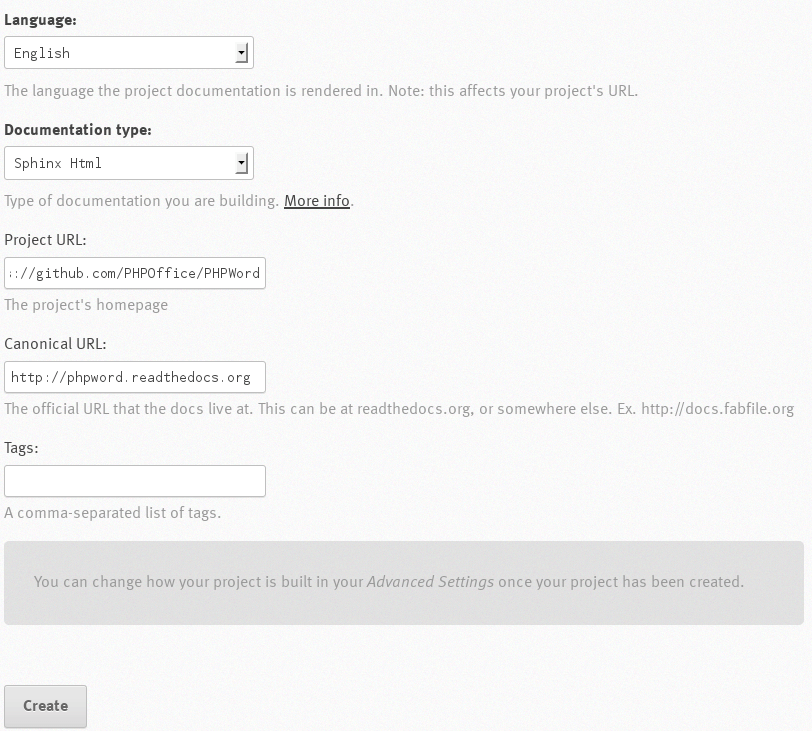
La seconde partie du formulaire permet de définir la langue principale du projet, le type de documentation (que j’ai laissé par défaut), l’URL du projet, et l’URL de la documentation (soit http://xxxx.readthedocs.org soit http://xxxx.domain.tld, si vous pointez un sous-domaine vers ReadTheDocs). On clique ensuite sur « Create ».
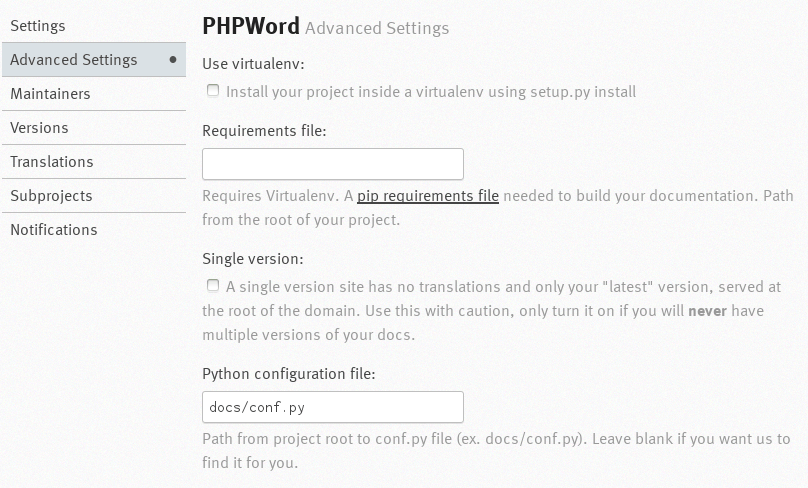
Si on exécute actuellement un build manuellement, la documentation ne sera pas générée parce que ReadTheDocs ne sait pas où trouver la documentation dans le dépôt du projet. Pour cela, il faut aller dans les paramètres avancés (advanced settings) pour configurer le dossier où se trouve le fichier de configuration de la documentation. Dans notre exemple, c’est docs/conf.py.
Activer le webhook sur GitHub
Afin qu’à chaque commit, votre documentation soit regénéré automatiquement, il faut activer un webhook sur GitHub.
Pour cela, voici la procédure :
- Aller sur la page « Settings » de votre projet ;
- Aller sur l’onglet « Webhooks & Services » ;
- Cliquer sur le bouton « Configure services » ;
- Chercher « ReadTheDocs » dans la liste de services ;
- Cocher la case « Active » et Valider.
Voilà, la documentation Markdown de votre projet a désormais plusieurs avantages : historisée via Git, automatiquement générée via ReadTheDocs, simple avec le format Markdown. Maintenant, à vous de jouer.
Commentaires
Je me suis retrouvé plusieurs fois à lire diverses docs sur le site ReadTheDocs mais je ne savais pas du tout ce qu’il y a derrière alors que je suis un fan de Markdown. Merci pour ce tuto très bien fait sur la génération d’un projet Sphinx et la configuration de ReadTheDocs.
@Yax :
Je confirme. J’ai eu du mal à comprendre la documentation de ReadTheDocs. Mais je me suis dit que pour PHPOffice, cela serait la solution la plus simple (sans hébergement propre). N’hésitez pas si il y a d’autres sujets que vous ne comprenez pas totalement et que vous cherchez à décrypter. Ce sera avec plaisir que je m’y attaquerais.
[…] La documentation d'un projet open-source est importante. Via ReadTheDocs, nous allons avoir une documentation simple, historisée et automatiquement générée. […]
Ajouter un commentaire